RNeth.AF
[ Page 6 ]


NF-5A model in 1/32 scale kit modelling report
page 2
page 3
page 4
page 5
Now it is time to investigate the Dutch NF-5 markings.
Lets look first at the general scheme and markings:
The initial scheme had Dutch AF roundels with on the upper and lower wing a roundel of 880 mm diameter (or 27,5 mm in 1/32 scale), and two smaller roundels on the intakes of 300 mm (or 9,3 mm in 1/32 scale). The registration number on the nose is 300 mm high (or 9,3 mm in scale) and on the vertical tail 100 mm (or 3 mm in scale).
On the aircraft various red and black texts (warnings etc.) can be found. Also, the "red" refuelling markings on the right upper spine are evident. And the usual ejection seat warnings and rescue markings typical of NATO planes are present.
The markings came from spare decal sets, some of them from Dutch Decals set #72029 with the roundels.
The type flew with several squadrons in the Royal Netherlands air force. But what squadron to pick. Except for the various demo air show planes with colourfull markings, the NF-5 looks the same for all squadrons with the exception of the squadron emblems on the vertical tail.

OK, I got a nice suggestion from
my friend Henk for a NF-5A scheme of a display demo aircraft. This would
add some colour to this model, but on the other hand not "overdo it" .

Dutch AF no. 316 squadron flew three
aircraft on demo air display flights during 1977-1979. They obtained a
scheme with a colourfull tail with the Dutch flag colours.
The three aircraft with the scheme were K-3048, K-3066 (spare plane) and K-3031, with plane number "K-3031" depicted for this 1/32 model.
This scheme seemed feasible to apply to the model looking at spare decals available to create the numbers and codes and with some masking work airbrushing the vertical tail could be done. The new Revell acrylic colours of red (31) , white (05) and blue (56) are very close to the national Dutch flag colours. The advantage is also that this paint is rather dull so it would not "flow" too much under any masking tape.
Thinning the rather thick acrylics from the square containers was done with water and alkohol.
I started with covering the surrounding
tail area and the rest of the model, masking the tail horizontal boundary
with Tamiya masking tape.

Next, the white base paint was airbrushed
and left to dry. The white areas were covered next with tape and this should
included the NF-5 lettering at the base; this was drawed in outline
on Tamiya masking tape and carefully cut out on a glass plate using
a sharp new X-axto blade to do this. This was carefully applied to the
tail making sure everything is well aligned and all edges of the tape rubbed
down with a tooth pick.
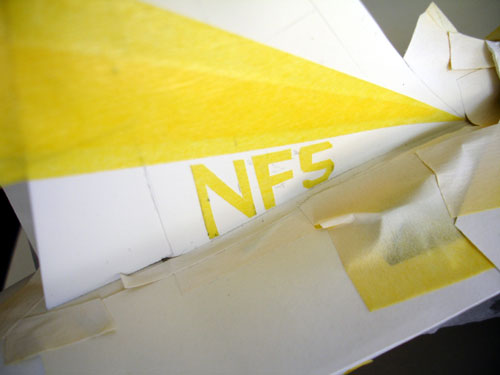
The next colour was the blue at the
lower tail area, applied with the airbrush. 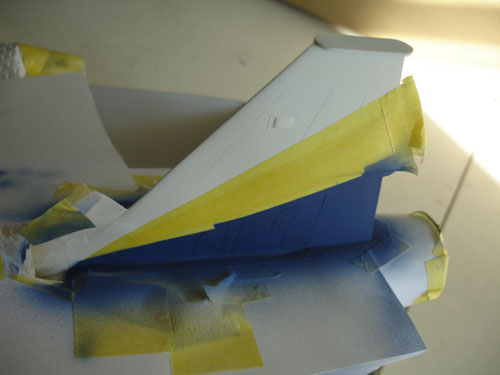
The blue was also masked off after
drying and the final colour airbrushed was the red.

Now the exiting moment: remove the
tape after 2 hours drying time.

It seemed to have worked out all right.
I only had to do a little touching up with some paint applied with a tooth
pick. The edges were rubbed clean for any tiny overspray again with a tooth
pick.
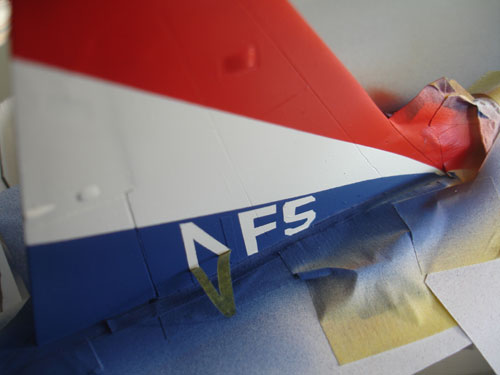
The NF5 lettering was remarkable
and came out without any problems, also thanks to the rather dull paint.
(Note that the overall tail will be varnished gloss later on with Johnson
Future).

NOTE: later on I discovered that two small bumbs / fairings are on each side of the vertical tail on the NF-5; these will be applied later on, but it would have been easier to have them applied BEFORE spraying the vertical tail ....
Next step is to apply on the NF-5
model the markings, codes and the Dutch AF roundels.
The model had already been given a gloss coat of Johnson Future, so there was a good base to apply the decals. Note however that always I add a little Future with a brush at each decal spot to avoid silvering. DACO decal setting also helps to get a perfect fit on any given surface.
The Dutch NF-5 sported various detail markings over the years with variations during its service career. Planes could have black NO STEP markings, but also eg. yellow NO STEP symbols. The same applies for the various warning texts. It is thus necessary to pick a particular period as applicable for your model and carefully study photos.
The markings were collected from various
decal sets (some from the spares decals box) and grouped in appropriate
order to get the correct numbers.
The roundels came from Dutch
Decal Set #72029 (see above for sizes).
Black numbers came from set #32006
Various smaller stencillings from
1/32 decal sheets from the spares box like those from F-15, F-4 and others.
From the Hasegawa kit F-5E decals also some could be used.
The ejection seat warning triangle
was given a white backing with white decal sheet.
The yellow NO STEP symbols came from
a 1/32 F-4F decal sheet (as seen here:)

Grey rivet Mike
Grant decals were used in selected areas with panels (seen above
on the roundel)
The small 316 squadron aagle was
cut out from a Dutch Decal Set #32006 . Normally this has yellow
disc around it, so it needed carefull cutting. It was applied to the white
tail area. Note that the eagle wings must point fowards on both sides.

The result is a rather nice looking
tail.
Applying the markings took considerable
time because checking each and searching photos was necessary all the
time.
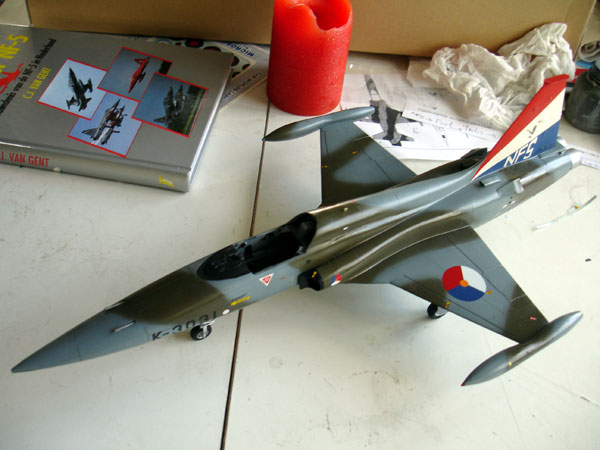
The gun sight was fitted on top of
the instrument coaming and the windshield was also added, the small gaps
filled with white glue and painted in the correct camouflage colours. Here
you will see also the cockpit tub, seat not yet installed. ....

On to next
[
Page 7... ]

(c) Copyright Meindert "designer"/ All rights reserved. Your comments are welcomed by webmaster
Created this page
October 18, 2007