[ page 2 ]
McDonnell Douglas F-15 Eagle Plastic scale model in 1/72 scale
... continued from page 1....
modelling report
Look for 1/32 scale F-15 models here...

From 1988 Hasegawa released completely new series 1/72 F-15 kit after their previous kits (see page 1). The new kits have better detailing and inscribed panel lines. The Hasegawa 1/72 kits are for F-15C or -D or -E appeared in various boxes and with various decals with kit numbers Hasegawa 00022, 00031, 00090, 00176, 00194, 00282, 00368, 00636, 00644, E12, K24 (04024), K111, K123, K126, K130, K132, K138, K146 !!!!!
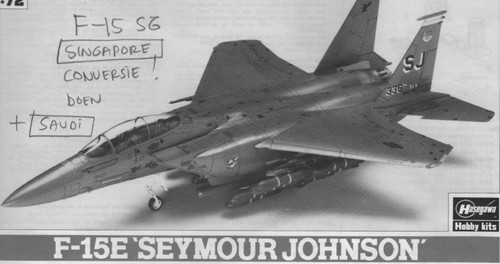
More than 20 years ago I was able to buy a pair of Hasegawa F-15E Strike Eagle double seater kits (#04201 Kt1) labelled "Seymour Johnson" released in 1991 at a very cheap price.

There are nearly 200 parts in the kit, a huge number for this scale. The parts are the same as for the F-15D but with extra bombs and CFT. There are however in the Hasegawa F-15 kits unfortunately no deep engine air flow ducts.


NOTE: sprues [F] and [Hx2] are specific for the F-15E.
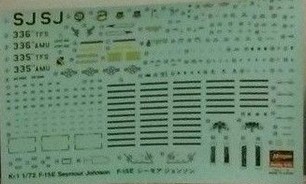
The decals are for two USAF schemes of the 335 TFS "Chiefs" / 4TFW and the 336 TFS "Rocketeers"/ 4 TFW in an overall rather dull FS 36118 dark grey.
The kit captures the differences of the F-15E from previous "Strike Eagle" kits with often prototype conformal fuel tanks (CFT) with different pylons. The new kit has separate parts for the conformal fuel tanks (CFT) that can be set on the sides but NOT their later style long pylons and stub pylons on the sides.
The CFT's are clean but underwing pylons are provided with optional non-standard CFT bomb racks with GBU and 2 underwing 600 gallon fuel tanks. But no Sparrow and Sidewinder missiles are in the kit. Hasegawa suggests to buy these through their separate to be purchased Weaponset IV; that was a move at the time that many modellers were not happy with.....
A few new instrument panels are in the kit (or decals if you wish). The ACES seats are fine but adding details will always improve them. A pair of different main wheels with different F-15E style hub but the wheel parts unfortunately are not wider (about 1 mm) as it should be for a heavier F-15E. The kit has though the correct bulged wheel doors.
How is the kit?
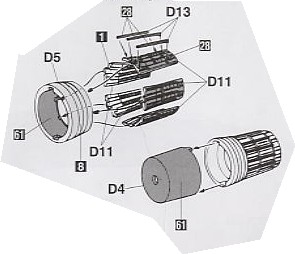
On the intake panels #C3 - C6 some injection pin marks need to be removed. The engine intake ducts are not very deep and can be extended inside with plastic card if desired fitting these at the rear edges of the parts #B1 and B2.
The Pratt and Whitney F100 engine exhausts are without "turkey feathers" with different detailed segments. The actuator rods #13 are in the kit but very vulnerable; use a razor saw to remove them from the sprue. Their assembly needs care in order to get a circular nice symmetrical exhaust.
(Note: on some F-15E versions, such as the Singapore F-15SG, different GE F110 engines were used).
On the rear fuselage separate parts are provided for the antenna bulges #C9, C11. On real F-15E's these may vary. Also on parked F-15E's the flaperons droop slightly. When desired, cut the edges and bend up and down.
This kit can be made straight out of the box but the later applied pylon stubs on the CFT are really missing to capture a Strike Eagle as it mostly is configured.
Two of these old Strike Eagle Hasegawa kits were made.
page 2
page 3
page 4
page 5
page 6
page 7
page 8
page 9
page 10
page 11
page 12
page 13
page 14
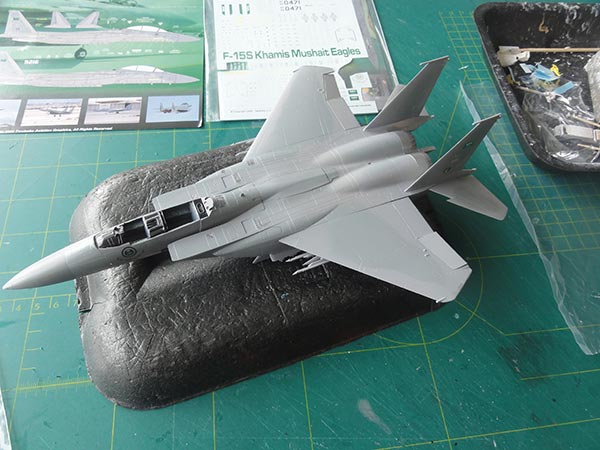
My modelling friend Bas gave me decals from a Two Bobs #TB72081 set for "Khamis Mushait" Eagles.

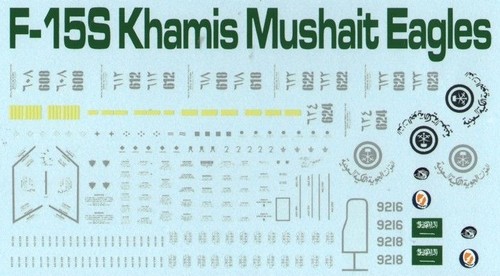
The Hasegawa kit can be made as per instructions for a F-15S.
But I wanted the later pair of standard long pylons and 2x3 stub pylons on the CFT's. I saw these almost always fitted on Strike Eagles. These are not provided in this older Hasegawa kit release (Note: in later Hasegawa releases F-15E Strike Eagle kit E39/ #01569 additional sprues were added for these later style long pylons on the CFT's, along with additional pods and bombs and different tail hook).

I was lucky to have a good drawing from Miliverse decal set MV-72003-1 for a Singapore F-15SG (to be made also). The drawing was scaled up to 1/72 scale and used to make from scrap thick plastic card these long pylons and stub pylons. I also looked at the big 1/32 F-15I made of the IAF that has those pylons.
A brand to use for plastic card is Evergreen but any thick card will do.
Cutting and sanding is needed to make the pylons but is not difficult.

These scrap made pylons from card were positioned on the CFT's and any small gaps were puttied and sanded. The 2x3 stub pylons will follow later on.
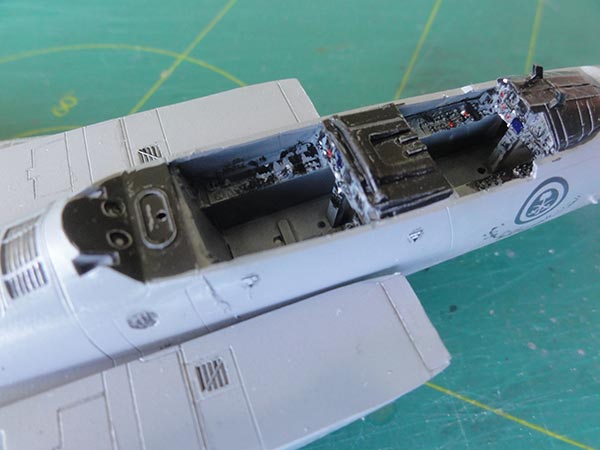
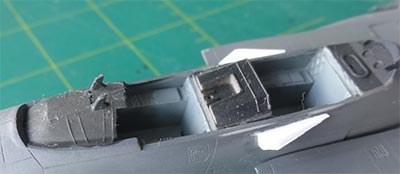
Also I wanted to add a bit interest to the model by opening an avionics bay panel in the forward fuselage. A panel was cut open with a razorsaw as seen in real photos of a F-15E. Add nose weight in the radar cone!

Inside the bay, some avionics "boxes" were to be added from scrap later on.
On parked F-15E's quite often the outboard wing flaperons droop slightly so I cut in the edges with a razorsaw and bended these a bit up and down.

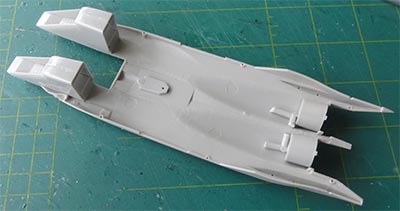
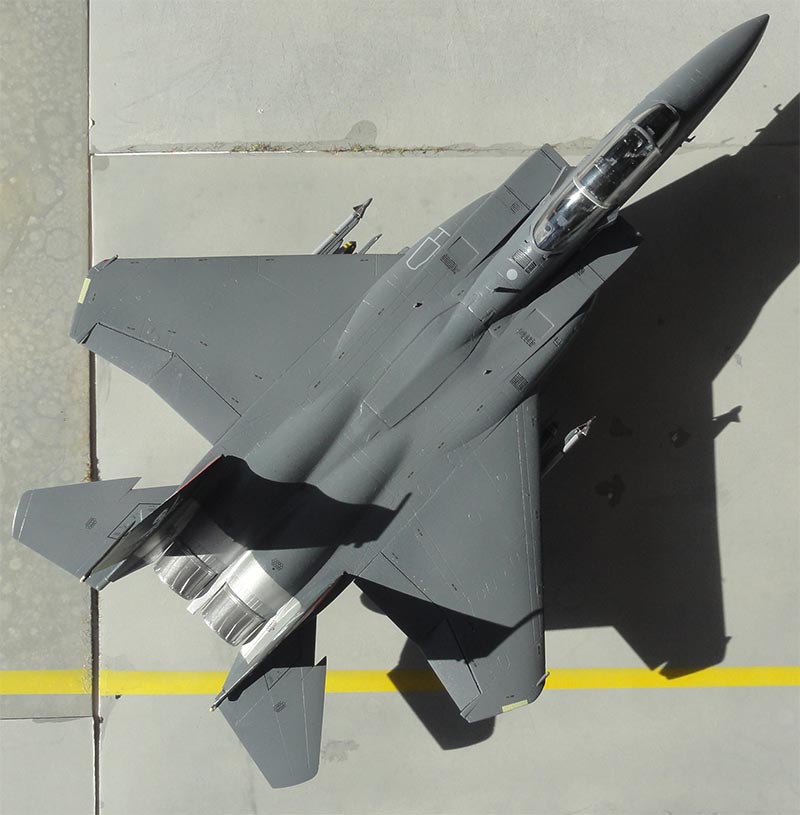
As seen here, there are no deep engine air flow ducts but it no really visible.
Onto the upper fuselage shell the intakes were set in place and the inside jet pipes. This was done to simplify alignment on the intakes. Tip: I later found it is better to fix the (closed set) airbrake to the big spine part to help alignment.

Though the instructions suggest to glue the mid spine #E8 to the forward fuselage nose section, it is better not to do so. It is better glued at the rear fuselage and than align with the forward section. It is needed to ensure smooth surfaces on the insides on the large air intakes to have it fit nicely.
On the top of the fuselage #A3 I had a small hole damage between the engines, this will filled and sanded.
The airbrake was set closed and needs sanding on the inside areas.
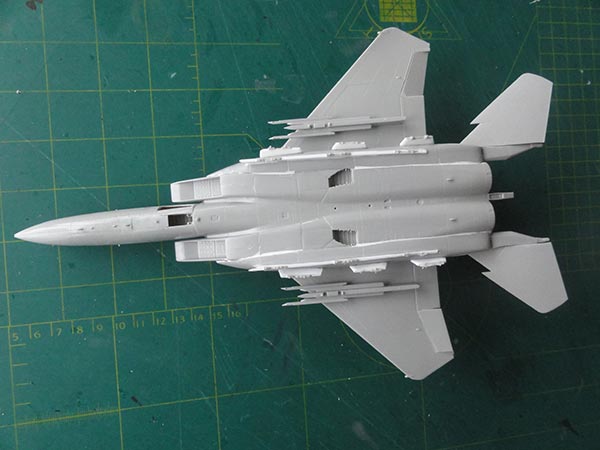
Closing up the assembly of nose, wing and fuselage was done.

The flaperons were tilted a bit.

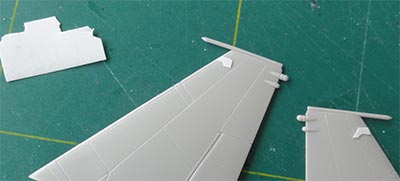
The many stub pylons type BRU/47A also made from card were next, to be fitted as well on the CFT sides. The standard wing pylons are also seen set in place.

Assembly continued.....
The two antenna bulges on the rear #C9, C11 can be used as per kit for the F-15S. The two vertical tails have the 2 anti-flutter weights on top as per kit which is correct for a F-15S. Set the tails at 90 degrees angle, a little white glue will close the tiny joint gaps.
(The standard F100 engines will be made and installed later on after airbrushing the overall scheme).

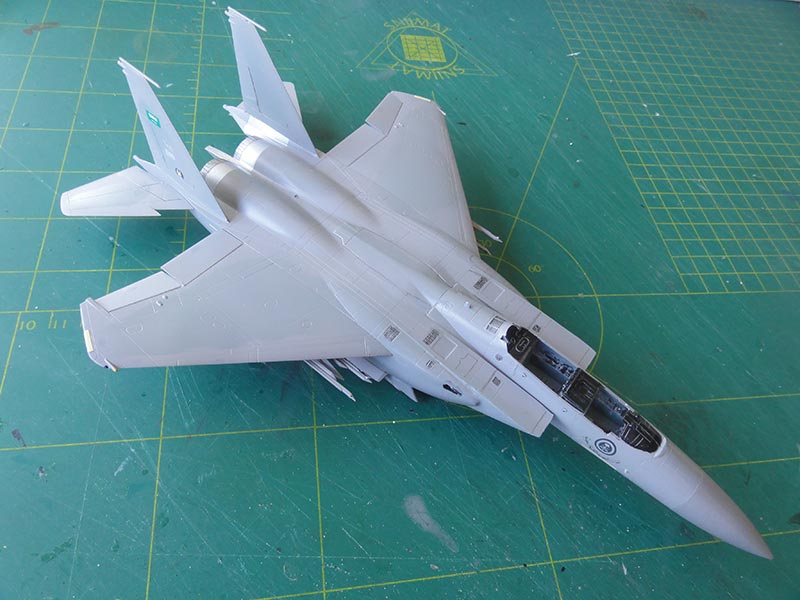
To check for any flaws and irregular surfaces, the model got an airbrushed base grey using Revell aqua 75 "Steingrau". It all seemed OK to get the colour scheme.

The colour pattern on the F-15S is similar as to the USAF but the colours are different on Saudi F-15S with now Federal standard grays FS36176 and FS36251.
I prefer acrylics and did not have the appropriate colours. So I looked at a Federal Standard Colour paint fan deck and used....
[A] FS36176 for which I used Gunze Sangyo H337 acrylic with a drop of H82 to make it a bit "blue'er".
[B] FS36251 using Gunze Sangyo H306 with a bit black mixed in to make it "darker".

These colour mixes were thinned with the Gunze Sangyo acrylic thinner and all was airbrushed.
The nose radar cone got a gray FS36231 using Gunze H317. The unpainted metal areas at the engines were masked and airbrushed aluminium. (It might be an idea to make these burned and shiny with your preferred paints).
Inside the medium grey cockpit a few black details were painted and instrument decals added as provided in the kit.
I did not weather overall the model as it flies above dry deserts, just some wash later on.
Decals of the Saudi F-15S would follow now after a few clear varnish coats of Johnson Future/ Pledge with my usual technique. This will prevent "silvering". You can off course use your own favourite varnish.
The Two Bobs decals are fine. It just takes a lot of time with all that stencilling to put on but the result is worth it.
The model would now be further completed as per kit....

The landing gears were next, I did not bother to widen the one piece kit wheels/ tires up by 1 mm. The main gear struts and wheels for the Strike Eagle were set at about 85 degrees (so not 90 than on F-15 C/D or J).
The main gear doors are seen closed on most parked F-15's and the remaining interiors and undercarriage legs were painted white. I also added later on a few hydraulic pipes from thin metal wire. (On the nose wheel of the real F-15E sometimes an small additional part is seen, not here).

The undercarriage legs and door insides were painted white.
The model was almost complete. Some additional details were added in the cockpit tub.

Seat parts got harnesses made from painted tape (not yet seen above). The various antennas and pitot tubes were installed as per kit.
The opened' up avionics bay got some white boxes from scrap. The access door was made from thin card and set open and is inside white coloured.
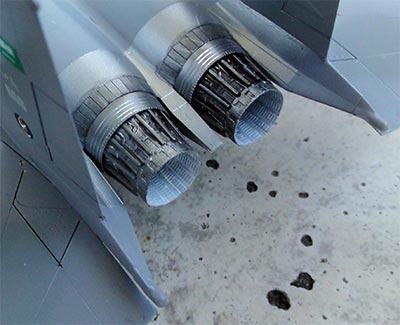
The Pratt and Whitney F100 exhausts "without turkey feathers" show their mechanism's; these were made and set in place. Close any gaps with white glue.

The exhausts insides were later painted with a brush "burned white".
The model got the two wing fuel tanks but also a pair of Sidewinder AIM-9L missiles on the outside missile launch rails. The missiles are NOT in the kit and can be obtained from other kits (such as F-15, F-16 or Hasegawa Weaponset IV etc). I also added a few laser designator pods retrieved from 1/72 Kinetic F-16D "Viper 52" kit: an AAQ-28 and AN/AAQ-13 pod.
Only some slight weathering with "wash" was applied at moving surface' recesses, gears and bays with Promodeller "dark" wash, but other techniques can also be used such as very thinned varnish (Future) with a drop of black acrylic paint.


When dried an overall semi-matt varnish coat was airbrushed of Johnson Future/ Pledge with 5% X-21 "flat base" with the usual technique.
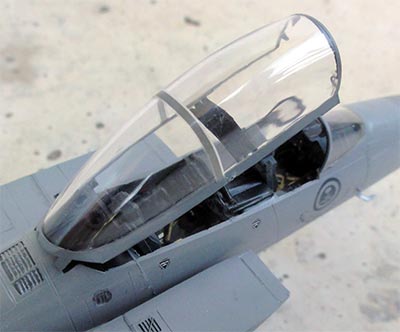
The canopy was installed open after it got a single mirror (so not 2 as in other F-15 versions) and a few handles at its front frame. The model was ready!


SAUDI ARABIA


 المملكة العربية السعودية
[ Saudi Arabia: area 2,149,600 sq.km mostly desert | capital: Riyadh | population: 33 million | GDP nominal USD 21,000 per capita ]
The Kingdom of Saudi Arabia was established in the 18th century by the Saud Emir. The air force was set up in 1916 with British assistance and flew types like the Caproni Ca.100, Albatros D.III and Farmans. In the 1930s oil fields were found and after the end of the Second World War oil exports became important bringing a large wealth into the country. The Gulf became important for its oil that was exported with large supertankers to the West and East. The air force flew western types like Avro Ansons and DH Vampire jets and trainers like T-28 and T-33 jets and Strikemasters. From the 1960s the supersonic BAC / E.E. Lightning was used as interceptor. These were followed up in the al-Yamamah I program by some 130 Tornado IDS as well as over 60 BAe Hawks and more than 120 F-15C/D Eagles and F-5F Tigers. In the 1990s after the invasion by Iraq of Kuwait and Gulf War, the new al-Yamamah II program saw delivery of some 72 F-15S from the USA. Tensions in the region saw in more recent years delivery of over 70 Eurofighter Typhoons and 84 additional F-15S and an upgrade of the older F-15's. Even some 5 Boeing E-3 AWACS surveillance aircraft are used and more recently a pair of the smaller Saab 2000 AEW. Trainers are no less than 55 PC-21 and Hawks. Transports are Airbus A330 and Lockheed C-130 and large numbers of various business jets.
The small Saudi navy has currently Dauphin helicopters and the army operates Blackhawk helicopters as well as AH-64 Apaches.


... in a scenery...


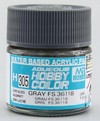
The second same Hasegawa F-15E kit #04201 was made as a SINGAPORE F-15SG.
I had ordered with my modelling friend Bas an excellent Miliverse decals set MV-72003-1 with very good instructions from Singapore. The national markings are "toned" down.

Many years ago I started this F-15E kit and wanted to make it into a USAF rather dull overall grey Strike Eagle. The model was not completed and remained untouched for many years until finally it was revamped to become a F-15SG. I even had the gears already installed and had airbrushed it dark grey. That is why you see this earlier dark grey surfaces on the photos below.
For the F-15SG SINGAPORE version some changes are needed on the kit:
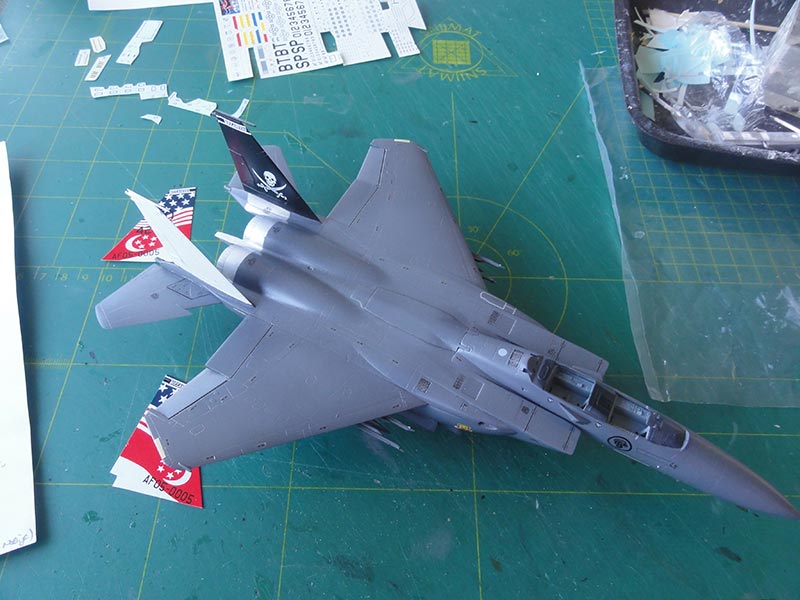
[A] The Singapore F-15SG has NOT the standard Pratt and Whitney engines but General Electric GE F110-129 jet engines.
The Hasegawa kit engines thus had to be changed. (NOTE: Hasegawa had a F-15SG kit #02092 released in 2014 has an extra sprue with these F110 and few other parts but that kit was not obtainable anymore).

I was lucky to have 2 GE F110 exhaust parts #A2 from Hasegawa F-16C/D kits of which some Blocks have the same engine. Also the Tamiya F-16CJ Block 50 kit or Revell F-16C kit #04633 has the exhaust but you will need two for the F-15SG. Only the exhaust fairing needs to be changed a bit in order to fit on the F-15 kit.
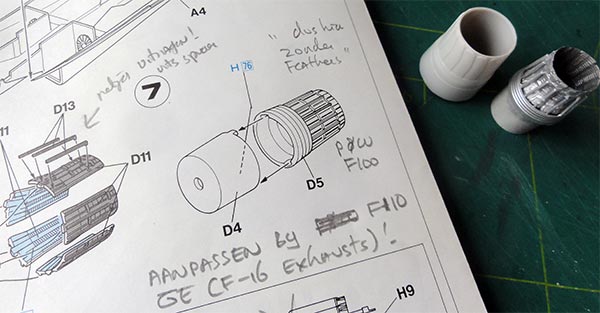
The GE F110 exhaust is seen on the left in the photo. The moulded ring was cut off with a TIGER saw from the two F-16 kit exhaust parts and from the Hasegawa F-15E kit parts #D5 used.
The whole lot was airbrushed in metal paints. The metallic areas on the rear upper and lower fuselage were at the same time airbrushed after masking at this stage.


The new made F110 engine exhausts for the F-15SG were set aside to be installed later.
[B] The rear fuselages ECM bulges on both ends are also different with two pairs of double bults. These were made from thick rod sanded in shape (so the kit parts #C9, C11 not used).
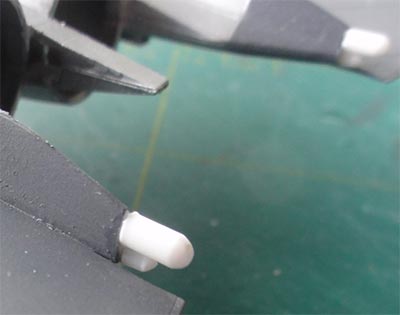
[C] On the cockpit sides 2 peculiar antenna fairings are also seen on the F-15SG. These were made from thick plastic card:
[D] The CFT were also used as per kit but the F-15SG also has 2 small side scoops and these were made from scrap.
[E] Also on the CFT I added the long pylons and BRU / 47AA stub pylons in a similar fashion as described for the F-15S above.
These pylons are seen here:

... set in place.... filling and sanding still needed.
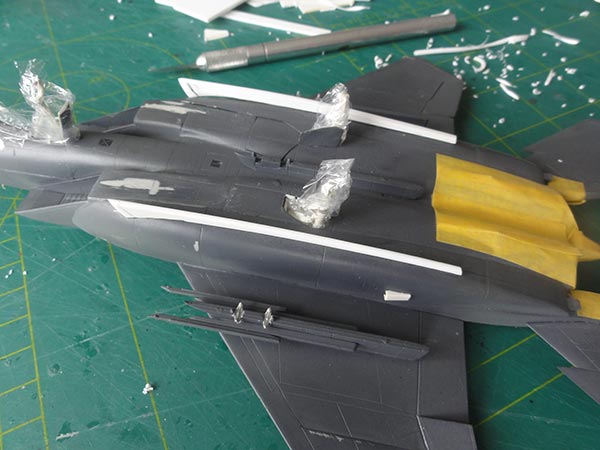
... and after sanding the stub pylons made from scrap added. They were given bits to suggest the braces and release locks for the stores.

[F] The F-15SG vertical tails also have tiny re-enforcement plates on the top leading edge. These were fitted on many F-1 's later on during their service life. This is shown in the Miliverse instructions and they were made from very thin card.
These tails were not installed yet as they would get a white livery with special markings for the Singapore F-15SG used for training in the USA. And they can be fitted later on.
Again as seen on parked F-15's the outboard wing flaperons were tilted slightly; so similarly as for the F-15S I cut in their edges with a razor saw and bended these a bit up and down.
For the remainder the model was ready for the final overall dark grey colour of FS36118 Gunship Grey. Overall Gunze Sangyo H305 acrylic was airbrushed after the metal areas, cockpit tub and gears were masked off.


Before decalling, a few clear varnish coats of Johnson Future/ Pledge with the usual technique were applied;
UPDATE: it is a good idea to add some 10% Gunze Mr.Color Levelling Thinner in the varnish mix. This really helps airbrushing a nice varnish layer. (it seems the thinner is lacquer! but a few drops really help levelling).

Than all those decals and lots of stenciling were set.
The Miliverse decals are excellent and I opted for the RSAF 428 FS scheme. The white vertical tail were also decalled and than installed. It features also the US style Jolly Rogers emblems and they fit well.

When done, final installment of the smaller parts like the landing gears followed.
[G] Smaller longer shaped F-15SG UHF and VHF antennas were made from thin card (so cut off the kit bits) and set in place below the forward fuselage and on the spine as indicated by Miliverse and seen on photos.
To add interest to this model, stores were to be installed as well. From various sources various bombs, missiles and pods were retrieved:
- from the 1/72 Kinetic F-16D "Viper 52" kit a pair of AAQ-28 and AN/AAQ-13 pods; these were airbrushed in FS36081;
- from the Tamiya F-16C kit a pair of AIM-9X advanced Sidewinders in a compass grey finish;
- from a Hasegawa weapon set VII a pair of GBU-31 JDAMs. These had a variation of colours of olive drab and black and yellow stripes.
One of the wing fuel tanks was also set in place at the central station. I don't recall where I got the central pylon from... may be from another kit.

The low-visibility light panels on the wing tips were painted very light yellow (so not using the decals).
A bit wash was applied into various recesses, grills and onto gear legs. That was followed by an airbrushed semi-matt varnish coat of Johnson Future with X-21 flat base with the usual technique.
UPDATE: again it is a good idea to add some 10% Gunze Mr.Hobby Levelling Thinner in the varnish mix. This really helps airbrushing a nice varnish layer.
As final steps the cockpit got some extra details with bits and pieces from scrap as described for the F-15S above. The front canopy frame got a single mirror and handles from stretched sprue. The canopy was set open and that completed the model.

Note the changed engine exhausts for the F-15SG, now the GE F110.
SINGAPORE


For info about the Singapore Air Force look here at this F-16 page....
 F-15SG , 428 Fighter Squadron, Singapore Air Force
No national insignia are seen on the wing.


... in the USA at Luke AFB for training....

.. at Paya Lebar... Singapore.

A very nice 1/72 Boeing F-15SG of the Singapore air force is now in the model collection.
On to next F-15 [ Page 3... ]
(c) Copyright "designer"/ All rights reserved. Your comments are welcomed by webmaster
Created this page August 28, 2018